1) Remove all existing mud flaps, brackets, side steps, or anything that may prevent you from properly mounting your new fender. When welding on trucks with new electronic motors you should disconnect your batteries before welding!
II) DETERMINING THE AMOUNT OF SUSPENSION TRAVEL (air ride suspensions)
– Place the truck on a solid, level surface. (Cement or blacktop)
– With the air ride suspension in the normal operating position, measure the height of the frame near the area around the rear axle. Place that number in box #1 of your work sheet.

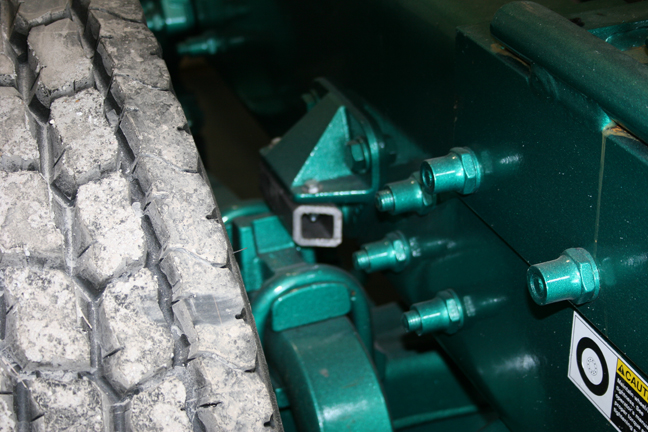
3) Next, drop the air out of your suspension. The frame should drop so that the suspension stops come in contact with the suspension plate between the u-bolts on the rear axle. The Peterbilt Low Leaf suspensions can have as much as 3 to 3 ½ inches of travel. To keep the fenders as low as possible we need to reduce the amount of travel. We do this by adding to the stops (see picture). It should not affect the ride of the truck. The stops that we have supplied will need to be mounted to the existing stops.
Just how much to add is different on every track. Anywhere from ¾” to 2 ½” may need to be added. The amount of travel needs to be reduced to 2”. In most cases the 1 ½” square tube in your bracket kit is a good starting point. You will need to drill two holes (13/32) in each existing stop. Use the Stop Template (T-204-1) provided in the bracket kit to mark your holes. Place the template on top of the existing stop and center it around the gusset of the original Peterbilt stop. Mark the holes and drill thru, then place the 1 ½” square tubing (# 204-15) under the original stop and use a clamp or visegrip to hold it in place. Next, drop the air out of the suspension and take another measurement in the same area as before.
If you still have too much suspension travel, start adding to the bottom of the stop using the stop spacers provided in your kit. These spacers (205 and 203) can be welded to the bottom of the 204-15 or 204-5 stops as needed. Once you have the right amount of travel ( 2″ ) place that figure in box #2 of your work sheet.

4) When you subtract box #2 from box #1 you will have the amount of frame drop for your truck. This figure should be 2″. If your figure is less than 2″ you will need to raise your suspension or grind some of metal off of the bottom of our stops. (Doing this will not affect the ride of your truck. It will only limit the amount of downward travel when you drop the air out of your suspension for hooking or unhooking from a trailer.)
5) Once you have the right suspension travel bolt the stops in place using the 3/8” X 1 ½” stainless bolts provided in your kit.
III) TIRE TREAD CONDITION
– Determine the amount of tread on the rear tires. Most rear tires have between 28/32nds and 30/32nds of tread when they are new, or almost 1″ of tread. If your tires only measure ½” inch of tread, then you will need to add ½” to your work sheet in box #3, for tire wear. If you have new tires on the rear of your truck. then 0 will go in box #3.
IV) TIRE HEIGHT
1) Measure the height of the rear tires from the ground to the top of the tread. It is best to place a yard stick or level across the top of both tires to get a good measurement. Place the figure in box #4 of your work sheet.

V) FENDER POSITIONING
– Now that you have found the proper fender height, place the suspension in normal operating position. (Note: if your truck has any air leaks or will unexpectedly drop the air out of the suspension, it is best to hook the truck up to a shop air supply.)
– Mount front and rear fender brackets to the fender. Using the 3/8 SS bolts, place the stainless steel plates on the outside of the fender and the steel plates with the slotted holes on the inside. You will need to insert the stainless plates #320 into the light box through the outside light hole then angle it up as you push it through. Do Not use the SS lock nuts at this time . They will be used in the final installation process. The fenders will need to be removed from the bracket later. Leave the bolts loose for now. (Note: There are left and right brackets. )
Next, place the fender over the rear tires. Set 4 screw jacks at each lower corner of the fender (see photo). You may need to place a piece of flat metal or wood between the jacks to hold the fender in position.
– You will need to set the fender so it is centered over the tires. On most trucks you will need to notch the inside edge of the front corner of the fender to make room for the front suspension hanger. Cut away a little at a time until you are able to move the fender into position (do not get carried away with the saw).
When you measure from the outside of your truck’s frame to the out side of the fender, front and rear, you will have a measurement of 31 ½” to 32 ½”. Dual-wheeled trucks can be equipped with three different rim configurations: (1) all steel rims you will need to place the fenders at 31 ½”outside of frame to outside of fender; (2) one steel and one aluminum rim will be at 32″; or (3) two aluminum rims will be 32 ½”.
This is why we have slotted the holes in the brackets, so you can place the fender in exact center of the tires. Slide the rear “L” bracket toward the frame of the truck. Remember to leave enough room between the “L” bracket and the frame for the 3/8 rear mounting plate. Snug up the three 3/8 bolts so the bracket will not move.

– Measure from the edge of rim on both the front and rear outside tires, to the edge of the fender. Move the fender either forward or backward so that those two measurements are close to being the same. Try to stay within ½” of each other. (see picture)
– Place a 30″ or longer level on top of the fender. It works best if you have two levels one to place on top of the fender over the rear axle and one over the front axle. Use each one of the jacks to raise or lower the fender until it is the proper height (Red Box on Fender Worksheet) and level the fender at the same time.

– Place a 30″ or longer level on top of the fender. It works best if you have two levels one to place on top of the fender over the rear axle and one over the front axle. Use each one of the jacks to raise or lower the fender until it is the proper height (Red Box on Fender Worksheet) and level the fender at the same time.
VI) Mounting Brackets
(Note: during this process always check your measurements and level readings before you do any hole markings, drilling, or welding.) ( Also, if you have an electronic engine, disconnect the batteries before doing any welding!)
– Mount the front suspension bracket (#9022) to the front portion of the suspension. Depending on tire size and fender position, there may be a space between the bracket # 9022 and the 1 ½” tube on the fender bracket. (see picture). We have supplied you with 3/8” and ½” spacers, sometimes one or both are needed to fill in the gap. Once you have the front bracket in the proper position, check the measurements on your fender again. If the measurements are correct, tack weld the front bracket.

– Next, place the rear frame bracket between the frame and rear “L” bracket. Are there any existing holes in the frame that could be used to mount this bracket? If there are, mark them on the bracket and drill the holes. If there are not, drill four holes in the frame bracket and then mark the frame and drill it also. Once the holes are drilled, bolt the rear frame bracket to the frame.
– Slide the back “L” bracket into position. Is the 2″ vertical tube too long? If so, mark the proper length, then use a chop saw or torch and cut the 2″ tube at a 30 ° to 35 ° angle. Then place the 2″ x 2″ x 1/8″ cap over the angle cut and weld it in place. Using the level again, check for straightness. (Note: let your fenders hang freely, never pull or push them into position to make them meet your brackets. It is up to the person installing the fenders not to put the fenders in a twist or bind; if they are in a bind they may crack. Be sure to use all four mounting bolts on your back bracket.) Check the measurements on your fender again . Tack weld the “L” bracket to the frame bracket.

– If everything looks fine, you can remove the jacks and drop the air out of the suspension to see the amount of tire clearance you are going to have. Be sure that when the air is dropped out of the suspension that the frame stops are hitting the axle. (We would like to see a minimum of 1″ clearance between the underneath side of the fender and a new set of tires.) If the clearance is satisfactory, you can either remove the fender from the brackets, and the brackets from the truck, and finish welding or weld the brackets with them still on the truck.

– The front bracket may have extra metal sticking out under the area where the fender bracket was welded. If so, you can cut it off. We have shipped you 4 front bracket supports (#5000) that need to be welded to the front bracket. This will keep the suspension bracket from flexing around the two bolt holes. After the brackets are welded, check to make sure the bracket did not warp or twist. As mentioned earlier, the fender must not be pulled out of shape to meet the brackets. If warping occurred, FIX IT FIRST before you mount the fenders. Be sure all brackets and fenders will not come in contact with any moving parts of the suspension.

VII) Final Preparation
– Your fenders are now ready for the final touch. You can sand the outside gel coat and paint them to match your truck. DO NOT bake the fenders in a bake booth!
– You should also install the rubberized liner to the underside of your fender. This will also help protect your fenders from road hazards.

3 ) Paint the fender brackets to match the fenders or frame of your truck.
VIII) Final Installation
1) After all paint has dried, reposition the fenders back on the truck. Use the levels again to check for straightness. Apply Anti-seize to the three stainless steel bolts that hold the fender to the fender bracket. Now, using the stainless steel nylon lock-nuts, tighten the six bolts that hold the fender to the bracket. These bolts should be checked often during the first few trips. Tighten them tight , you won’t hurt the fiberglass.


IX) Your First Trip
– Check the 3/8” fender bolts once a day for the first week, then once a week there after. If you remove the fenders for tire or brake work, check them again once a day for the first week, then once a week there after.

– If you notice when you hit a large hole or bump that your stops hit, you may need to add a little air to your air ride. Just raising it a ¼” may be enough. Don’t let the stops keep bottoming out!